Welcome to My Local Agency’s Blog!
This tutorial will go through what IVR is and its properties and how to integrate it into your campaigns!
IVR stands for Interactive voice response. It is used to have an auto answer in contact reach whenever the subscriber calls the campaign number
IVR can record messages it can forward calls it allows callers to subscribe to campaigns that they are calling for and much more
*Before we get started IVR is only supported by Twilio.
Step 1:
To create a new IVR hover over the IVR icon and select “create new”

There are two sections in the IVR
- The IVR properties
- The Build IVR

Step 2: Let’s start with the IVR Properties.
Here you will add a name to your IVR.
You can also select an accent for your IVR & if you want the voice to be male or female.

Step 3: Now let’s move on to the Build portion of the IVR
The build section of the IVR is where you can add widgets.
Widgets are features in the IVR that let you control how you interact with the caller.
To add a widget you will select an option from the drop down.
And then click on the green + sign.

Before we dive into each of the widget options and their functions here is a reminder:
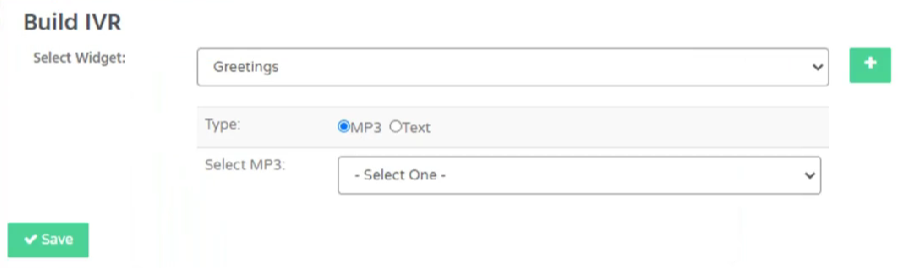
In each section there is an option for how you wish to add the message.
You can add an MP3 file (if you already have a pre recorded file for your IVR)
To do this go to your dashboard and hover over the IVR section and select “MP3 list”.
Here you can upload your MP3 files (make sure you do this first)

You can also add text if you do not have a pre recorded file and the software will generate a voice for you.
Now let’s go through all of the widget options and their functions.
1.Greetings
The greetings IVR is mainly used as a welcome message when a subscriber calls the campaign number.
Most of the time this is placed at the beginning of each IVR.
2.SMS
The SMS widget is used to send an SMS whenever someone calls a campaign number.
Here you can add the phone number that you want to receive the message and then you can add your message.

3. Email
The email widget will do the exact same thing as SMS but with email

4. Call Forward
The call forward option is used to forward the call to another phone
To set this up you just enter the phone number that you want to forward the call to.
The Whisper option can be used to give the caller instructions that they are being forwarded.

5. Record
The record widget is used to record the callers message.
A voicemail email is needed to forward the call.
You can add a message before the caller records their message letting them know they are being sent to leave a message. (this is what the caller will hear).

6. Next Menu
The next menu widget is used to provide the caller with options when they call in.
Here you can add a numbers system.
For example press 1 if you wish to speak with a representative, press 2 if you wish to record your message, press 3 if you want to hang up.

To add more number options just click the green + button.
The arrow next to the widget is used to add sub widgets.

In this example if you wanted to add the caller as a subscriber after they pressed a number you would add that here.

After each widget make sure you add a sub widget to hang up the call.
You can do this by selecting the green + button and selecting “hang-up”.
This makes sure that each call is ended.
Step 4: Now let’s integrate you widget into a campaign.
Select the campaigns section on your dashboard and select the “regular” tab.

Next you will choose your campaign and select “edit” under the action tab.
Go to step 2 of the wizard.
scroll down to where it says subscription and enable “Subscription by call”
Choose your IVR and click “save”

And that is it!
You now know the ins and outs of IVR and how to integrate it into your campaigns!
We hope this tutorial has given you all the insight you need and if you need any assistance during this process please reach out to our support team HERE.
*Please allow 24-48 hrs for response time
Want Contact Reach?
If you don't already have it, but you want to check it out to see it's full power, so you can Create Predictable Long-Term Recurring Revenue!